28 May 2013

Eco-Friendly Wine Rack Giveaway!

eco giveaway
Welcome to the Eco-Friendly Wine Rack Giveaway!
Hosted By Miss Frugal Mommy and Sponsored By ThinkEco2
ThinkEco2 makes eco-friendly products to organize your kitchen & wine, garden products. They reclaim, reprocess, and repurpose wood that was on it's way to the landfill Green Wine and Garden Products. Trendy, Rustic, Modern, Vintage. 100% recycled wood products.
eco4 eco6  
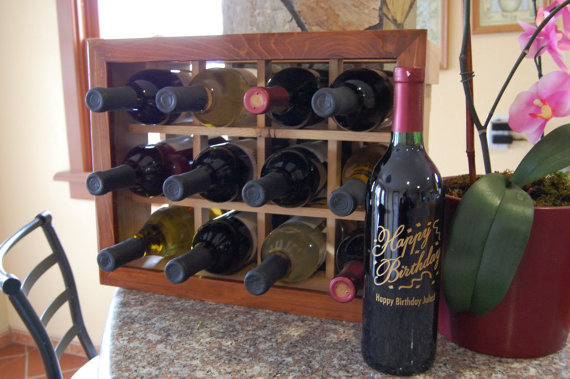
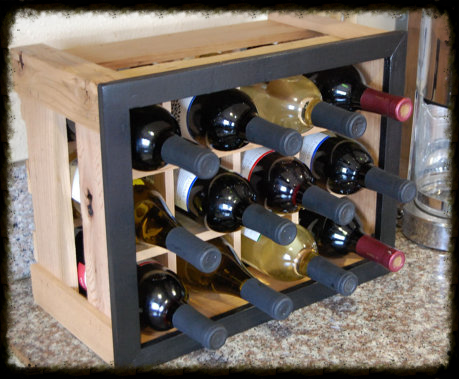
The Eco-friendly Wine Rack:
An elegant way to store and display your wine selection, this framed wine rack holds 12 bottles and fits perfectly on your counter top.
This eco-friendly wine rack embraces the green lifestyle.
You can view Miss Frugal Mommy's review to learn more about this product!
They are made from 100% recycled cedar.
Check out the ThinkEco2 shop for additional colors and products.


I  personally love all the colors and styles, and love the rustic look of this! I really like that it's repurposed wood and I know right where I would put it... I mean it would look great right on the counter or even on top of the fridge. 

One winner will receive a black frame repurposed cedar wine rack as pictured below (wine not included)
eco11
Enter to win in the Rafflecopter below, all entries will be verified, open to US only.
a Rafflecopter giveaway Disclosure: Miss Frugal Mommy and Bake.Love.Sew are not responsible for prize fulfillment. This giveaway is no way sponsored, endorsed or administered by, or associated with Facebook, Twitter, or Pinterest. If you have any questions/concerns or would like your product featured in a giveaway, please contact Miss Frugal Mommy.

20 April 2013

Top Ten Mother's Day Brunch Ideas


Mother's Day is right around the corner! Last year we decided that instead of giving our Mom's and Nana's something they really didn't want or need we would host an Annual Mother's Day Brunch for them, it was a huge success and everyone is looking forward to this annual celebration. So we have been super busy searching out the best, the yummiest, the most Mother's Day worthy brunch ideas and recipes out there. Here are some of our favorites:


#10. Broccoli and Sausage Egg Muffins from Snacking in the Kitchen:


#9. Donut Hole Breakfast Skewers by ValSoCal


#8. Blueberry Breakfast Cake by The Cake Blog


#7. Strawberry Cream Cheese Stuffed French Toast by Table for 2...or More


#6. Baked Eggs  by Saveur


#5. Traditional Mother's Day Brunch Table from Paper Fancy


#4. French Toast Shooters by EM for Marvelous


#3. Butterfly Brunch Invitations (free to download and print) by the elli blog


#2. Raspberry Sparklers by tasty trials


#1. Brunch Menu by At Home In Love


Hope you enjoy these!! 


02 April 2013

Easter Ham Leftover Stew

As a family we are trying to be less wasteful. This is not easy, especially with kids, but one way that we are are doing this is with food. We are making a conscious effort to use up leftovers and (hopefully) not throw them away. We would always save leftovers, thinking they would get eaten, but more often than not and more often than I care to admit, we were throwing food away. Over the course of a year it ends up being a lot of food.

 So we are menu planning, and using what we have before we buy more. And at least one meal a week is cooked using leftovers. This week it was leftover Easter ham.

For Easter, my youngest son had requested that my husband cook a boiled dinner and as this is easy, fairly inexpensive, and something the whole family likes, we readily agreed. Yes, my husband cooks for holidays. I am spoiled, I know and as I tell him often I am the luckiest girl in the world, and yes he cleans up after himself too! Anyway, we had a TON of ham and a ham bone leftover. None of us care for pea soup, so what to do???

Make my friend's Slow Cooker Ham & Bean Stew of course!!! It was delicious, easy to make, and used up a lot of our leftovers! I used a combination of Kidney and Pinto beans and everything we already had in our pantry. You could easily add more veggies to this and make it to fit your families tastes. I found it smelled wonderfully like baked beans but was definitely more of a stew. It was very filling and as it was a cold blustery spring day here in Maine, it was perfect having a nice hot stew for dinner. There's just something about soup that warms the soul on a cold day, don't you agree?


So head on over to cook.can.read, tell her Amy sent you and find a delicious new recipe to cook and a great book to read! 


15 March 2013

Friday Finds: Easter Edition


I have been on a pinning frenzy, there are so many talented bloggers and crafters out there posting GREAT ideas!! Here are some of my favorites that I found...


Like these Cadbury Egg Cupcakes from Pizzazzerie, YUM!!! Genius!


And how about these chalkboard eggs from Oh Lovely Day...


Maybe you want quick and no mess, these black & white eggs, from Obviously Sweet are for you!

Loving the lace from Celebrating Everyday Life.


Here's a free printable from It's Always Autumn.


**Click on the image to go to the site**


And my personal favorite:


How cute are these? Oh What Fun you ROCK! LOVE THEM!!

Hope you enjoy these Easter ideas, and these blogs are great. When you check them all out, check out all the other hip, fun, and crafty ideas they have posted!


Cookies and Cream Frosting

Anyone that knows me knows that I love frosting. It's one of the few things that I can actually still eat! I love cake and frosting, but mostly the frosting. Buttercream=Joy.

I have made frosting for a long, long time and every once in a while I get adventurous and add something, but nothing, NOTHING beats just your basic Buttercream frosting.

Last Wednesday was national Oreo cookie day and I also had a small office birthday party that day, so was able to make some Oreo goodies and celebrate my coworkers birthday all at once. I made chocolate cupcakes (gluten free of course) along with the cheesecake bars in my previous post. I wanted to do an Oreo frosting, but all the recipes I found were for cream cheese (not good for the lactose intolerant) and Oreo's. So, I adapted the basic (Wilton's) Buttercream Icing recipe and made my own version of cookies and cream frosting. YUM.

Ingredients:
1 cup shortening
1 cup of butter or vegan butter like earth balance
2 teaspoons of vanilla
2 pounds confectioners sugar
4 tablespoons of milk (soy or almond work as well)
10-14 Oreos or gluten free Glutino brand chocolate cookies smashed up into small pieces.

Directions:
1. Beat butter and shortening until well blended.
2. Add vanilla and mix well
3. Slowly mix in confectioners sugar a cup at a time on low speed. Add milk a tablespoon at a time and mixing well in between.
4. Add chopped cookie pieces and mix with a spatula.

**Please note that If you are planning on using a decorating bag you will want to chop Oreo's in a food processor into small pieces.

Yield: enough for 24 cupcakes or approximately 4 cups.


Enjoy!


06 March 2013

Oreo Love

Happy National Oreo Cookie Day!!! To show a little Oreo love I made a few different recipes this week...


"Oh, Oh, Oh, ice cold milk
And and Oreo Cookie
They forever go together,
What a classic combination
When a dark, delicious cookie
Meets an icy cold sensation
Like the one and only cream, 
crunch, chocolate, O-R-E-O"


This is one of the delicious recipes that we made. It was super easy to make, and could be easily be your dessert tonight!!

Oreo Cheesecake Bars
recipe by brown eyed baker
Ingredients:
For the crust:

23 Oreo cookies (I used the gluten free version)
2   Tbsp melted butter

For the Filling:

12 ounces cream cheese
1   cup granulated sugar
3   eggs, at room temperature
6   Tbsp sour cream
1 1/2 tsp vanilla extract
12 Oreo Cookies, coarsely chopped

Directions:
1. Preheat oven to 325°F. Line an 8 x 8" baking pan ( I used glass, but metal works fine too) with parchment paper or foil, allowing it to hang over two sides (don't use wax paper - it will smoke in the oven).


2. Make the crust: Process the Oreo cookies in a food processor, or put in a Ziploc baggie and use a rolling pin to roll into fine crumbs. Pour crumbs in a bowl and drizzle melted butter over the top and stir until butter is evenly distributed and all the crumbs are moist. Pour the moist cookie crumbs into the prepared baking dish and press into an even layer (a fork works best for this). Bake for 10 minutes.
3. Make the filling: Beat the cream cheese on medium high speed until smooth, about 2 minutes. Gradually add the sugar and beat until completely incorporated.
4. Slowly add the eggs, one at a time, beating well after each one and mixing until completely combined. Scrape down sides of bowl and add sour cream and vanilla, beat until mixed well.

5. Using spatula, gently fold in chopped Oreos. Pour batter over prepared crust, smoothing it into an even layer. Bake until the edges are set, but the middle still jiggles slightly, about 40-50 minutes depending on your oven.
6. Place pan on a cooling rack and let cool to room temperature (about 2 hours). Cover with plastic wrap and place in refrigerator for at least 3 hours before serving.

7. To serve: Lift the cheesecake out of the pan using the parchment or foil handles. Slice into bars and serve. Store leftovers in an airtight container in refrigerator for up to one week.


*find original recipe here at  brown eyed baker

Enjoy!


05 March 2013

Salted Caramel Sauce

I needed caramel sauce for another post/recipe for later this week and decided I would be brave and make my own. I have made it before using heavy cream, but didn't have any on hand. So, what to do?! No worries, I found this recipe for DIY Caramel Sauce at Confession of a Bright-eyed Baker and it only uses sugar, milk, and sea salt. Say What? That's right only three ingredients!!!

The hardest part of making this caramel sauce is making sure it doesn't burn! But, as a warning make sure you are careful not to splash or spill any of it on yourself while making, sugar melts at 320° and will hurt pretty badly if you aren't careful (don't ask me how I know this).


What you will need:

  • 1 cup granulated sugar
  • 1 1/4 cup milk (make sure it is at least a 2% milk fat content)
  • 1/4-1/2 tsp sea salt (for a more "salted caramel" use 1/2 tsp)
What you need to do (read through completely before starting):
  1. Place sugar in a large heavy bottomed pot, shaking it so it is in an even layer. Place the pot over medium-low heat (This scared me and I actually tried to do it as a double boiler first, so I wouldn't end up with burnt sugar. Don't do it. The sugar won't get hot enough to melt). Set a timer for 8 minutes and let the sugar heat up. Check on the sugar once the 8 minutes are up. It should look pretty much the same. Set the timer for another 8 minutes, I promise something does happen this time! Now you want to keep a close eye on your sugar. Around the end of this 8 minutes, it will start to melt and liquefy.
  2. At this time you want to make sure your milk is all ready! You don't want to burn your sugar, because you have to heat up your milk... So microwave your milk for one minute in a microwave safe bowl and have it ready and next to the stove. You also will want to have a trivet ready to for your pan of hot sugar and a heat safe spatula or spoon.
  3. You will start to smell the sugar heating up and melting before you see it. It will begin to appear light brown and translucent in some spots. As soon as you see liquefied sugar, you want to take your heat safe spatula and carefully scoop the melted sugar over the non-melted sugar. Essentially, you are making sure the already melted sugar doesn't burn and are moving it out of the way, so the rest of the sugar can melt... Continue to do this until all the sugar is completely melted, stirring gently until all the lumps are completely dissolved and the sugar has turned a rusty golden brown color. 
  4. When the caramel is the right color, you want to move it from the burner (leave the burner on) onto the trivet and quickly stir in half of the warm milk. Now this will do funny things to your melted sugar, and honestly you will be wondering if you just ruined your caramel, but I promise it will turn out OK. Also, this is where I splashed hot caramel on myself, so please be careful. When you pour in the milk, your melted sugar will bubble and steam, a lot. I mean a lot. It will cool down the sugar and make it get hard and weird candy looking glob. It's OK, just continue to try and keep the caramel moving while you are stirring in the milk. Then stir in the rest of the milk. 
  5. You will have hardened caramel on the sides of your pan, and it may look weird and lumpy, it's OK. Return the pan to the medium-low stove burner and stir. When the caramel starts to melt you will be able to carefully scrape the sides of the pan. Continue to stir until all the lumps are melted, it will take about 5 - 10 minutes, so be patient. Your caramel will thicken as it cools, so do not cook it too long! 15 minutes tops after it is all melted. 
  6. Remove the pan from the stove and whisk in the sea salt. Pour your caramel into a heat proof container (if using glass, put something metal in it to prevent shattering). I used a glass Pyrex liquid measuring cup. Cover and place in the refrigerator, letting it cool and thicken, Keep the caramel stored in the refrigerator.
Yield 1-1 1/4 cups caramel.


Enjoy your caramel!! And check back tomorrow to see what we're putting it on!!!


Blogging Tips